12/11/12

DIY Looms (Kaitlyn edition!)

With all the craziness of the holiday season and trying to finish up some of my own crafts while studying for finals, I have not been able to work on any projects you have not see yet! With that being said, one of the blessings of living on a Sorority hall is that you are bound to find one or two crafty girls around. Luckily I did not just find a crafty girl, but one who has her own make up tip blog (check out Kaitlyn's blog here!). She created this great craft that is simple yet looks great (plus I have been eyeing it up for the past month!).


Things you need:

  • Cross stitch holder (all sizes work!) - can be found at any craft store
  • String (you can get the low quality kind! A more stiff string works better)


The directions are so straightforward I barely have to write them down. Take your string, wrap it around the holders, then hang them up. Easy, simple yet so crafty and so chic!

12/10/12

DIY: Dorm Christmas!


One of the biggest struggles with being at college is being away from home during the holidays. I love seeing my house get beautifully decorated, listening to Christmas music and being surrounded by my family. While I cannot bring my immediate family to college, I find that decorating the dorm is a great way to get into the spirit of the season! Here are some tips, tricks and maybe even some new ideas to decorate!


Get your own tree! A mini tree is perfect because it does not take up that much space yet you can still go all out with lights and ornaments. Why not try something different than a classic green tree (like Kaitlyn's pink tree) to spice things up even more?


Another great DIY activity is making your own ornaments. At any craft store you can purchase ball ornaments that you can open up and fill with your own ideas. I filled one with tinsel and a gold snowflake yet the other with gold balls. Both very different looks, but both look great on the tree. Glue ribbon around to further complete the look and finish with a big bow on top and string to dangle your ornament.

\

My room mate made the ball pictured below. She took a plain ornament from Salvation Army and completely covered it in multi-colored glitter to give it a cool, yet different effect. Do not be afraid to experiment and make every ornament your own! The more personalized they are the more your tree will feel like one from home.


The ever classic snowflake - a college DIY'ers dream. Simple, essentially cost free and is open to so many different creative elements. This is one of my favorite tutorials on how to make a 6-pointed snowflake. Simple and easy! Try making some with scrap booking paper, or better yet outline them in glitter to really make the snowflakes stand out. 

Be as creative as you can be and have the best holiday season during finals! 


DIY Dry Erase Board/Calender 2.0


As I continue to embark on my effort to not break my budget with Christmas presents, I am finding more and more creative ways to give people cute organization tools that are so useful! A few months ago you saw me create my DIY Calender using paint chips to create an easy dry erase board to organize dates and my monthly schedule. I am participating in a secret Santa exchange and in addition one of my best friends is transferring after this semester. Both of them are very much type A personalities who LOVE organization and creativity, so whats not better than revamping my previous calender?


Things you need: 
  • Scrap booking paper
  • Frame (I bought mine from salvo and spray painted them!)
  • Card stock or paper to use as background of the calender itself
  • Screwdriver or flat tool to help you pry open the calender


For my DIY Calender 2.0: I wanted to make more of a weekly calender but with the addition of a space for a to do list/notes of important activities! You are free to cut the scrap booking paper to however you see fit and however you want to style your calender. Make sure to not forgot to write labels for each space though!


For the DIY Dry Erase Board: This project is honestly even simpler than the calender because you can just use one large sheet of paper! However be weary - depending on the dimensions of your calender you may run into the problem of your whole sheet being unable to fit. Simple solution - mix papers! Cut different shapes to position the paper in a slight collage way to not just fill up space but section off your white board.


With the holiday season here, do not let your budget ruin you from creating fantastic gifts for your family and friends!

12/9/12

DIY Marble Mason Jar

With Christmas fast approaching and minimal college student budget, my brain has been flowing with different ideas for presents that do not break the budget. In my sorority we have a secret santa "sis" activity where we get one of our sisters and give her 5 small gifts for 5 days and 1 big gift the sixth day. I wanted to give things that were cute, artsy yet useful! This mason jar craft can be perfect for storing  hairbands in your bathroom, pens on your desk or just having on display in your dorm. 

The post I found my inspiration was this post on gluing marbles to a soup can. Its a bit different, and with the soup can its a different feel but I really wanted to keep inside the jar clean and use this beautiful pack of flat marbles I got on black Friday! 


Things you need:
  • Mason Jar
  • Marbles (the flat stone kind)
  • Hot Glue Gun


First make sure you clean your jar. Nobody wants a gross looking jar! Next start from the bottom of the jar and glue a line of marbles. You may not be able to squeeze a perfect line in every time but do not sweat it. As long as the jar looks filled, no one will notice one marble not in line with the bottom row. After you finish gluing all the way to right before the rim of the jar, go through and make sure you have no hot glue strings and you are done! Now you have a beautiful new jar to gift or display in the home.

11/25/12

Be Still and Know...Artwork


What to do with blank canvases and wood chip letters? Make wall artwork of course! I am currently taking a Elements of Design class that has really gotten me in an art minded mode where I am consistently looking for new inspiration with color, words etc. I have been really wanting to make a bible verse inspired artwork for the dorm and found this great pin that was simple and did not that was simple, used some elements of design inspiration and looks great.


The verse inspired by "Be Still and Know" is Psalm 46:10:

 "He says, “Be still, and know that I am God;
    I will be exalted among the nations,
    I will be exalted in the earth.”


Materials:
  • Acrylic Paint (I just used blue and white to mix my own colors)
  • Canvas - any size you choose
  • Chip Chatter Tall Adhesive letters (The color does not matter since you are painting over them)
  • Paintbrushes (I used size 4)


First take your letters and position them as you would like on your canvas. Then peel off the stickers and place them on the board. Then take your blue and white (or whatever color you want to fade) and mix a light blue to paint at the top part of your painting. Then when you decide you want to transition the colors, place blue on your pallet (or whatever surface you are mixing colors on) and only and a bit of blue to your mic to get a slightly darker blue to begin fading. 

With this part you really just have to play around with how dark you want to make your bottom shade of blue. In order to blend take your paintbrush and stroke back and forth the light and dark blue so if flows easily.

Once you have painted to your hearts desire, you now have a beautiful new piece of artwork to display for all to see!

10/31/12

DIY Watermark T-Shirt


During my fall break I had the blessing to take a road trip to Indianapolis and Cincinnati with my roommate and a few of our close friends we never usually get to see when we were at school. It was an incredibly  relaxing yet busy fall break that was such an awesome time for friendship, fellowship and taking  a much needed break from the craziness of Grove City. 

One of the coolest blessings of the entire trip actually was meeting my friend's sister as well as roommate whose apartment was decked out with pinterest crafts. To say the least, I was in crafting heaven. After being inspired by all the crafts in the apartment, we collectively decided to make a night of crafting, chocolate covered pretzels and plenty of romantic comedy movies. 


One of the roommates was talking about her latest project, dyed batik T-Shirts. After seeing the tutorial here we could not even resist trying this project. After making a forever 21 run to get some cheap v-necks and looking up some bible verses, this pinterest project was a go.


Materials:
  • Cotton T-Shirt
  • Elmer's Glue
  • Plastic bag (for inside the shirt)
  • T-Shirt Dye (we chose a light pink)


You first need to wet your shirt completely with cool water. Next take your shirt, put the bag in between and draw whatever your heart desires.


You then need to allow the shirt and glue to dry completely. Warning, it will take a while. We actually had to blow dry them the next day in order to try to try them.

Finally dye following the box instructions, wash and enjoy! Below is our finished projects!

9/26/12

DIY: Ticket Artwork


I have been collecting ticket stubs since as long as I can remember. Whether it be a cheesy teen movie or the concert of a lifetime, I save them and cherish the memories that flood back when I look at them. For the majority of high school these ticket stubs have been tacked onto a bulletin board growing in size, number and inconvienence. However, I stumbled upon the cutest idea to store them in a fun, artistic way! Here is the original pin where I found the inspiration.


What you need:
  • Shadow box (I purchased mine at IKEA)
  • Scrapbook paper
  • Letter stickers (optional if you choose to write "Admit One" yourself)
  • Ticket stubs or memorable scraps of paper


With this project you honestly do not have to have any creative ability. You simply cut out a piece of scrap booking paper to fit the back of the box, write "Admit One" or whatever saying fits your fancy, put the ticket stubs in the front of the box and close it up. You know have a beautiful new memory holder to display on your wall or shelf.


I decided to place mine on my shelf in my dorm so my light will shine on it and if people see it, it starts a conversation. What creative ways do you display memorable ticket stubs or papers you acquire?

9/19/12

DIY: Chevron Art


Lately I have become very inspired by stripes. I am taking an elements of design course and all of my projects have related to some form of lines or stripes. This has definitely been an awesome way for me to look at art and my DIY projects! Some of my favorite striped projects I have seen on the Pinterest sphere are chevron stripes. Streamlined and classy, yet they are still so fun and you can be so creative with them! These two (pin 1 and pin 2) are my inspiration for the project.


What you need:
  • Canvas
  • Painters tape
  • Scissors
  • Ruler
  • Assorted paint - this is completely up to you. I chose spray paint but you can use whatever paint your heart desires


You first need to tape off the canvas with your desired chevron stripe length. I used a ruler for the first two rows in order to get an accurate estimate of spacing and and just make sure I had enough points on the canvas to make the chevron pattern look even. However, with that being said I was pretty relaxed with it because I was by no means aiming for perfection. 

Also side note, the taping does take a while and is hard to get used to. I at many times had to redo pieces, cut small strips to fill awkward gaps and stand up to get a better view of the painting. Pretty tedious work, but worth it. 

Once you have your entire canvas taped, you are free to begin to paint. I chose using two different spray paints to add to a more "messy chevron" look I was achieving. I painted every other stripe with the orange, then the blue, waited about 3 minutes and added a second coat. Wait approximately 2 hours until your painting is dry and take off and you have a beautiful new piece of art for your room.


The great thing about this artwork is you have a lot of room for creativity. I contemplated painting a bible verse on, cutting out a silhouette (like the giraffe pin) or painting a monogram on, but I actually really like the simplicity of the piece. What ideas would you use to spice up the chevron? Also if you have ever tried it or want to, let me know!

9/12/12

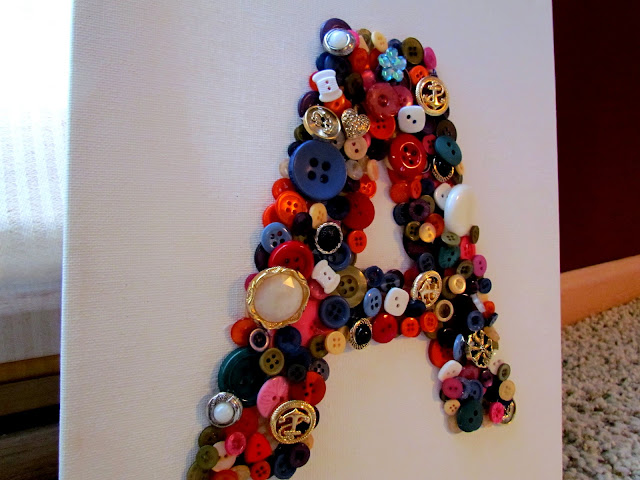
DIY Button Art


When you think of childhood what do you think of? Cotton Candy, Streamers, bike riding or swing sets? Well, I automatically think of buttons. While a random choice, my mind always immediately thinks of the pencil shaped buttons I had on my Kindergarten jacket or the apple buttons on my teacher's cardigan. So when I stumbled upon this pin about button monogram art, I just had to try it.


This is definitely an easy way to make some art for your dorm, bedroom etc. All you need is:
  • Canvas
  • Hot glue gun
  • Assorted buttons (I found mine at Hobby Lobby)
  • Letter stencil (I own a cardboard A that I am saving for another project, so I used that as my stencil


All you have to do trace and start glueing. Simple right! When I glued, I really made sure to get a couple layers of buttons in order for there to be more depth and so you the canvas under the A tracing would not be visible.


Glue your favorite colors, shapes and forms! I really tried to make sure I used some plainer looking buttons for the bottom layer and then strategically placed some larger and more embellished buttons on top. 


Send pictures of your own button art creation! Are you using the monogram format like I am or are you feeling extra creative and made your own art piece?

9/4/12

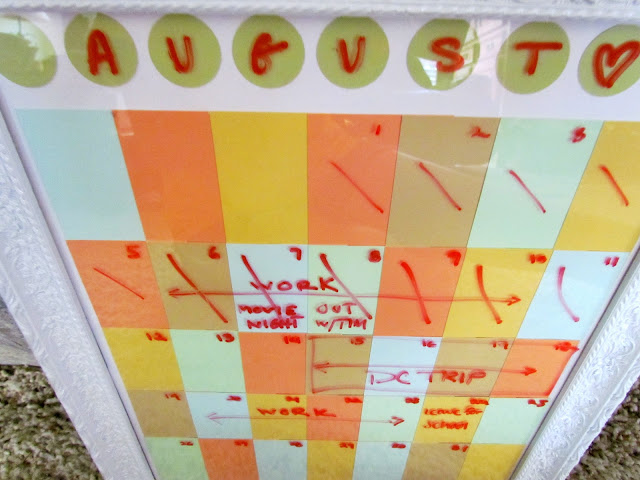
DIY Calender

So with the first week of the semester now under my belt and my initiative to get organized higher than ever, I have been inspired to organize all aspects of my life. Some use outlook, some have planners, but I love the idea of a calender just in my room in plain sight so I never forget those important dates I need to remember. With that being said, I found this dry erase calender idea and gave it a go with a couple of my own personal twists.


What you need:

  • Frame (I bought one from Salvation Army and spray painted it with a glossy white paint)
  • Paint samples
  • piece of paper/card stock to fit the frame
  • hole-punch if desired

So instead of drawing the calender onto the surface, I took some inspiration from this calender DIY and used paint samples as the "days". After snipping off the paint name labels, it is basically trial and error with how you space them. I ended up overlapping them slightly just to make sure I have all straight lines. A lot of my paint samples were a little longer, so I went for long and narrow so I could have my calender vertical.


After laying out the samples and gluing them to the card stock, I punched out 9 circles with a circle punch to create the space where the month would go. Fun fact: September is the longest month name with 9 letters. With this step, feel free to use your creativity! Cut squares, make a single strip, etc. I just so happened to own a circle punch (about $8-$10 dollars at a craft store) and put it to good use.


Once you are done, just clean the glass well with Windex and put your finished product in! I ended up putting the calender on my closet door so I will always look at it in the morning. Let me know what you think about the calender! Also what are your great dry erase ideas that you would want me to try?

8/31/12

Paint Sample Art


I have really been inspired by a lot of awesome paint sample art I have seen by posts like these (give examples). Here is my hand at making some easy art to place in an 8x10 frame (or larger with a border).
I snipped off about 1cm of the paint sample where the name of the paint was and I then cut a ton of triangles, initially at random and then at the end to fit. Just glue on with a glue stick and say hello to your new art.


Some art projects had all the chips right next to each other, creating a type of mosaic art. However I chose to have the slight spaces in between because it is just a lot easier to work with, less tedious and I like how it the spaces in a way ties the art together and makes it look clean, not messy.

Are you inspired for some paint sample art? Go steal some paint samples from Home Depot or Lowes (the more the better) and craft away. Send me your creations!

8/30/12

Tin Can DIY


So my latest discovery while stumbling pinterest has been how useful cans are. They are easy to reuse, multi-functional and can create a lot of cute and fun crafts. I have been in desperate need of a run to Hobby Lobby, so this was a perfect way to give me my craft fix.


I did not use a specific tutorial, because it is pretty self-explanatory. Just modge podge some fabric onto a tin. Bam. Your done.


Now one thing some tutorials did is modge podged both the underside and overtop of the fabric, while others did not even use modge podge and used a fabric adhesive spray. As you can see with the silky purple fabric, the tin came out a bit bumpy and not exactly how I imagined it, which was a little disappointing since I love that fabric. Off to the recycling bin.


The other fabric (a stretchy cotton) came out great, except you can see the glue line a bit in the back and I really do not want to modge podge overtop of the fabric to preserve the softness.
I am also contemplating tying a couple strings of hemp chord or burlap around to give it some extra flair.


Now time to find some of my sharpies to put in these cute cans. My rating of the craft is that it’s a great easy fix, but not something I am eager to do again since it comes out less than ideal. I may try using just scrapbooking paper next time if I do! I will let ya’ll know.

As for today, I am off to my job and to hopefully get a couple more crafts done before I head back to college! Plus a Chipotle fix. That is a necessity.

8/27/12

Stained Mason Jars

I had some mason jars I washed and saved for a while after finishing up some canned goods and really wanted to try this craft (see the original tutorial at u-createcrafts). I love the clean, polished look, how you still see the beauty of the jar and especially how easy the recreation seemed!

The other day I tried one pin I found where you put paint on the inside of a mason jar, but I am not really happy with how it turned out. I used a dark forest green which looks nice, but as far as usefulness, I am tentative to put anything in the jar in order to not wreck the paint.

Anywho, onto the stained jar tutorial/review!


What you need: 
  • Mason Jars (or any jar will do - as you see I used both a mason jar and a regular canning jar)
  • Mod Podge
  • Food Coloring
  • Paper plates
  • Wax Paper


Preheat your oven to 200 degrees and get 2 cookie sheets ready by placing a sheet of wax paper over. Mix 2 Tablespoons of water and 4 Tablespoons of Mod Podge and your desired amount of food coloring to a paper plate and mix well. 

Tips:
  •  It will be watery, so do not be worried about that
  • You may get a few clumps here or there of Mod Podge that has already dried and cannot be mixed in - just make sure you scoop it out or be careful when pouring the mixture into your jar so that you do not get any clumps in
  • B careful with the amount of food coloring you add. Less is more.


Next pour the mixture into your jars, coat evenly with a thin layer and pour remaining mixture back out.   Then place your jars upside down on one of the cookie sheets and place in the oven for 3 minutes.

After 3 minutes take the jars out and wipe the rims well with a paper towel (tip - get one slightly damp and the other dry to make your life a little easier). Then place jars right side up on the unused cookie sheet for 30-40 minutes. 

Tips:

  • My reasoning behind having two cookie sheets is I found that a lot of the excess mixture made the wax paper pretty messy the fist time you take the jars out of the oven, so in order to prevent any of the mixture getting on the outside of your glass it is just best to have a clean cookie sheet ready to go.


Boom! After 30-40 minutes passes, you can take your jars out and be like "Man. I am so crafty".


Mine turned out a little streaky because I think I had my mixture on a little too thick, but otherwise I love them! I actually think the streaks add a bit of character to the jars. I am definitely going to tie some cute ribbon or rope around the middle or the small jar to spice it up even more.

Overall it was a great and definitely easy tutorial that took me less than an hour to do. Plus there was not much trial and error involved which was also a plus.

What are your favorite mason jar crafts? Let me know in the comments!